Sunday, November 15, 2015

2015 Macy's Thanksgiving Day Parade BINGO!

Thanksgiving 2012
Several years ago my then 9 year old son had some pretty uncomfortable ear surgery the day before Thanksgiving.  In an attempt to keep him occupied and distracted, we started a new family tradition.  Thanksgiving Bingo!  The first set of cards were made quickly without graphics.  Graham pulled out all of his fuzzy friends and we spent Thanksgiving morning with our Bingo cards.

Card 1
Card 2
Card 3
Card 4
Card 5
Card 6

Since then, our cards have gotten a bit more involved.  I thought I'd share the 2015 version of the cards.  They're easy to make.  I simply used the Macy's Thanksgiving Day Parade official website and a bit of Googling to fill in pretty basic table.  I'd suggest making your own using the floats and balloons and performers your kids like best.  Or feel free to use mine and save yourself the trouble.


Bingo card preview

Friday, May 9, 2014

Do You Wanna Get a Frosty?

My 17 year old is on a bus returning from New York City where she saw Of Mice and Men on Broadway with her Honors English class.  She got Chris O'Dowd's autograph and James Franco was in the play, so it's been a memorable experience.  We've been texting during her long drive home and ended up writing a parody of Do You Want to Build a Snowman based on our trip to Wendy's last night.  She told me the last part made her sad... which wasn't my intention.  I just kind of changed the words from the original.  So anyway... this is how I entertained my kid on the ride back from NYC this afternoon (and a pretty good indication that I need to do something more productive during nap time):

Do you wanna get a Frosty?
C'mon, what do you say?.
You know it really could be fries
With real cute guys
...oh darn he's gay.

You know that they're so yummy
In a cup or cone
I wish you would share that fry.
Do you want to get a Frosty?
It doesn't have to be a Frosty.

(Get a life, Mom)

Okay... bye...

(Knock knock knock...)

Do you wanna get a Frosty?
Or drive my car down to the mall?
I think some conversations over due
I've started talking to
Your old discarded dolls.
(Eat a burger, Barbie)
It gets a little lonely
All these empty hours
Just watching your years fly by...

Do you wanna get a Frosty?
And a side of fries....?

Why I Didn't Buy Into Teacher Appreciate Week... again.

Dear Teachers:

Please don't think that you're not appreciated.  I show my appreciation by sending you a kid with his
homework done and spelling words studied.  I show you my appreciation by teaching him manners and setting the bar high when it comes to respecting you, the school, and the rules.  I show you my respect when I try, time and again, to make sure you're getting the best kid I can assemble for you.  

The lack flowers/candy/mugs/hand stamped greeting cards isn't a sign that I don't appreciate you.  It's a sign that I'm doing my best to make sure my kids are an asset to your classroom.  And I would hope that's more important than all the Hallmark gifts combined.

With Highest Regards,

Mama Jacques

Friday, April 11, 2014

DIY Alphabet Book

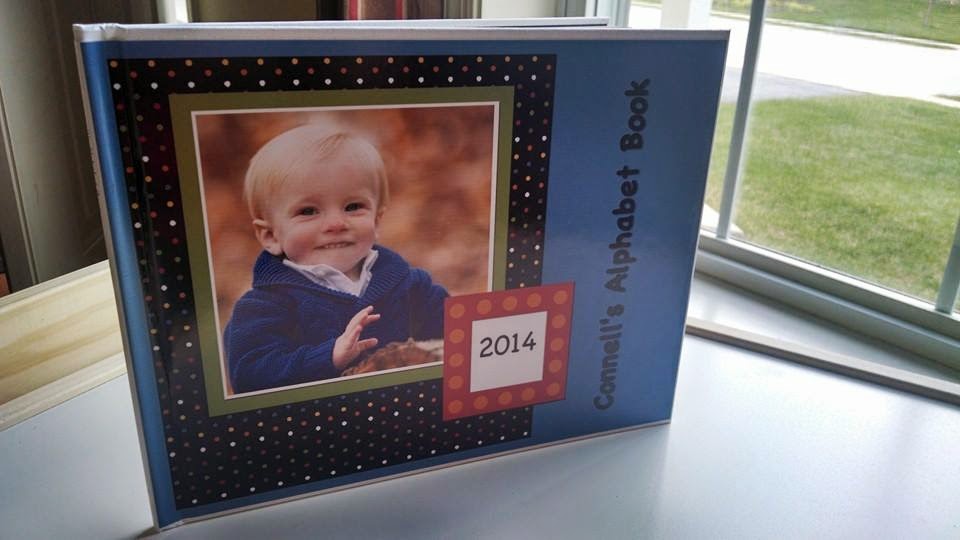
It's been a busy six weeks since I've found time to write anything worthwhile.  My big project has been this:


Using the Memory Mixer program and a great coupon from Walgreens, I was able to make Connell a hard bound, personalized alphabet book for $18.  It wasn't nearly as hard as it sounds, but it does take a little time.  I found that by working on it slowly made it a very relaxing way to have a little "me" time.

Step One.

Organize your photos.  I created a new folder and went through all the photos I've taken since Connell was born.  Luckily, I was able to find the difficult letters. (V - volleyball, U - Ukelele, X - X-ray, Z - Father Zenon, one of our favorite priests.)  Had I not had those, I would have had to add a step and fill in the blanks.  I ended up slightly less organized than I would have liked, but this is how my folder looks:


I found some great additions while looking through my husband's Facebook photos.  I didn't save them as intentionally as I had planned, but you get the idea.  Rename the pictures with the letter you plan to use them for.

Step Two

Find a photo program you like.  Shutterfly, Walgreen's, and other online photo sites have albums you can create online.  I didn't care of those because they didn't allow for must flexibility. I purchased the Memory Mixer program.  (Please note, Memory Mixer has an affiliate program.  I am not part of that and I am not advertising for compensation.)  It took me about an hour of fiddling and futzing to learn the basics.  They offer great tutorials on Facebook and YouTube.  It's fairly straight forward and I can definitely see myself using this program for many projects in the future.  I accidentally deleted the first book I made, so I ended up recreating it.  (Completely user error.  Memory Mixer is great at saving things logically.)  I like my second attempt much more.  

The first two screen shots are from the first book I created.  The templates in Memory Mixer come pre-made, but are entirely customizable.  


When I made the second book, I decided to tweak the layout so each page had letters in the same place.  Memory Mixer allows you to add a ton of layered embellishments, but for this book I was more interested in simple pages with the focus being the photographs and easily identifiable letters.  I chose the Chalkdust font because the "a" looks more like a traditional hand drawn letter that Connell will learn to write.

Step Three
Build your book.  I try as hard as possible to be thrifty, so when Walgreen's sent out a 50% off coupon for their photo books, I jumped.  I was able to export each Memory Mixer page as a .jpg.  You can do this by selecting the "Share on Facebook" option.  Each page will be saved to your hard drive.  Then you can upload them to Walgreen's.com.


The tricky part at this point is making each photo page span the entire page rather than fit into their pre-sized template.  To do that, drag the photo into the template and then select it.  A menu will pop up and will have the option to span the left, right, or entire layout.  Choose accordingly.


I chose to use one of the "same day delivery" books. I sent it to them, feeling very nervous, at 1:30.  By 2:15, I had email confirmation that it was finished.  I am thrilled with the results and very impressed with how well Memory Mixer and Walgreen's worked together so seamlessly. 


Connell and I read the book several times a day.  He recognizes the people and places in it and I'd like to think he's beginning to recognize the letters, too.  My next project is going to be a counting book, but that is going to take some very intentional photography!


Saturday, February 22, 2014

Dr. Seuss Party

I'm a terrible blogger.  We had a great toddler party and I didn't take nearly enough photos.  I will share the few I did take and resolved to do better next time.

So first, let me explain my party philosophy:  Don't hide in the kitchen.  Don't have an agenda.  Don't spend a ton of money.  And most importantly, have fun!  So with that in mind, I set up some play centers around the house using our Seuss theme.

My grandfather retired from Random House, so I have quite a collection of Seuss books.  I gathered them together and put them with some of the alphabet toys we've collected over the years.  Another area I set up (and didn't photograph) was based on "Mr. Brown Can Moo".  I had my older kids bring the Little People barn out of storage and set it up with all of the farm animals I could find.

You can't have a Seuss party and not include a One Fish, Two Fish activity.  (Shouldn't that be "an One Fish, Two Fish"?  Grammar police, please help!)  Using a tri-fold board (Dollar Tree - $1), a yard of flannel (Jo-Ann Fabrics - $3), and 4 sheets of felt ($1 for all 4 - Jo-Ann), I made a quick felt board.  Most of the kiddos at the party were around 2 years old, so generally they pulled the fish off the board and giggled, but they had fun.  If we hadn't had such awful weather for the weeks leading up to the party, I would have picked up a plastic fish bowl to keep the pieces in, but Mother Nature had other plans.


A Cat in the Hat bulletin board set worked as the backdrop for a table of yummy food that I forgot to photograph. (Pinterest has oodles of ideas.  I went with quiche and small sandwiches since it was bunch and other kid-friendly snacks.)


Brown paper protected the train table nicely as it became the craft station.  Since they were mostly toddlers, we did simple crafts.  They put animal stickers on a zoo print out ("If I Ran the Zoo"), stars stickers on Sneeches, apples on a tree (apples = pom poms, "Ten Apples Up On Top"), and they made a cute Cat in the Hat craft.

Party favors are always fun, but of course I didn't take a picture.  I was able to have a friend order a copy of The Napping House through Scholastic for a dollar a piece.  I would have preferred a Seuss book, but that would have completely ruined my budget.  I added Dr. Seuss pencils, crayons, erasers, and bookmarks all found in the dollar section of Target last fall.  Wrapped them in striped tissue paper and voila - fun favors.

I hung streamers for Valentine's Day and left them up for the party.  They initially looked something like this, but without the polka dots.  (Check out this adorable birthday party theme):


After about 45 minutes, the kids discovered them and they very quickly became the best dollar I've ever spent on an unintentional party game. 


Once they'd finally pulled them all down, they spent 15 minutes giggling and shouting "Hooray!"  It was a wonderful end to a very fun party.

Sunday, February 9, 2014

What to do with a Wonderful One Year Old (Finger painting... again.)

Before I share a wicked cute series of finger painting photos, let me first tell you I fail more often than I succeed.  My initial attempt at the famous Pinterest finger paint project is proof of that.  This is true of my attempts at not only toddler crafts, but at many things in life:  housekeeping, baking, sticking to my grocery list, making it to the gym often enough, walking up stairs without falling.  But sooner or later I manage to figure most things out or come to the realization that it wasn't that important in the first place.

For our second attempt and this project, I used some heavy drawing paper stolen borrowed from my oldest daughter's art supplies.  I decided to shed my slightly obsessive need for things to be straight and symmetrical and went with a funky off kilter design.  (Cutting myself some slack is on my list of 'ways to be a better person'.  'Mastering stairs' is on that list, too.)


Popped a diapered baby in the tub and let him have at it.  Finger painting in the bathtub works well.  It limits the mess and results in a clean tub, clean baby, and cute art.  The finger paints were purchased at the Dollar Tree.  I couldn't find my homemade, cotton candy scented, organic finger paints.  The potentially poisonous, made in China out of Lord only knows what, cheap paints worked just fine.  He didn't put them in his mouth.


As you can see, Connell doesn't limit his artistic efforts to just his canvas. 


Hanging the finished art on the mirror to dry worked well.  The mirror needed to be washed anyway (as you can see), and the paint came right off.

The finished project will be a fun addition to our already growing collection of Valentine crafts!


Wednesday, February 5, 2014

What to do with a Wonderful One Year Old (Cat in the Hat Edition)


This is the view of the tree in my front yard.  We're possibly going to lose my favorite branch.  Connell and I have spent hours peeking out the window, watching the bird feeders dangling from that branch.  When he was brand new and fussy, we spent even more hours standing in the sunny window, watching the shadows cast by its leaves.  I'm trying not to begrudge Mother Nature, but please, lady, just leave my branch, okay?  We won't even discuss the lilac situation.

To continue to fight the mid-winter blues, I've decided to have a little gathering of playgroup friends in a few weeks.  We're going to throw Dr. Seuss a birthday party.  Selfishly, it gives me something to think about while we're trapped in the house by the evil weather.  The trick will be figuring out what activities the 'under two' crowd can handle in our limited space.  I decided to start with a simple Cat in the Hat craft and do a bit of a beta test.

Instructions:  Using red card stock, I cut out a rectangle to make the hat.  White card stock worked for the stripes.  Construction paper circles made the face and whiskers.  Leftover foam heart stickers worked for the nose and beads (stolen borrowed from my daughter's bead bin) made great eyes.

I found the key was to talk him through the activity.  He wanted to touch the glue, which was fine.  He enjoyed sliding the "stripes" around a bit.   We talked about "stick".  When we put the face together, we talked about nose and eyes.

It's fun to find ways to work new language into fine motor skills.  At this point, he will focus on things like this for anywhere from 3 - 5 minutes, so I find having everything handy and ready to go helps.  Eye contact, reassurances ("Good job!"), and encouragement ("Keep trying!") keep him engaged.  And his smiles keep winter from driving me completely insane.